All posts by Dan Benson

I am a creative designer and web programmer. I am business minded person that also loves to help people in any way that I can. I have been creating website designs and layouts for nearly 20 years.

WordPress News: How to use GIT for WordPress Development

Do you like Time Travel? Do you also like saving your work files? Well now you can do both at the same time by using Git to save your files while keeping track of each change, to each file along the way. Once you’ve saved (committed) a file in the project, the old version is saved forever allowing you to travel back through time to make changes or revert back to old files when needed.

Imagine your just uploaded your beautiful new custom theme to your WordPress site and you realize that you forgot to save your old CSS file and you’ve just overwritten the old one on your web server. You now have no way to revert back to your latest version of the old layout in case you have problems with browser compatibility in the new layout.

Git is a very powerful version control system that allows you to keep track of all your files during a project so losing file version along the way will never happen. This requires a few extra steps during your saving process, but it has saved the skins of many programmers from all over the world every day. Now, we should all try to save backups of our projects and files to protect from data loss and keeping old versions. Git takes that idea but saves each version of that file since it was created. It also protects someone from editing a file at the same time someone else is, preventing overwriting of each others new version.

Let’s take a look at the Git structure to get a clear picture of how the system checks out and references each file.

Git file reference structure

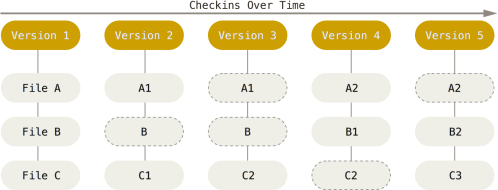
This table shows us how Git associates each file to the master project. Each time a change is made, a “snapshot” of the entire file structure is made. This allows us to see our project in front of us, while old versions are saved and hidden from view unless we physically use our time travel capability to revert. Additionally, if no changes were made to a file in a new commit, the old version will automatically be referenced instead of uploading the unchanged file into the project commit. These basic features are why Git is so powerful and efficient, that might explain why 42.9% of professional software developers reporting that they use Git as their primary content version control system.

To learn more about Git the features and the benefits, please refer to these links from which this article was sourced.

Web Accessibility: Removing Barriers to Web Accessibility

Do you know who Tim Berners-Lee is? If the name sounds familiar it’s because you probably heard the name before. He created the World Wide Web (WWW) and is founder of the World Wide Web Consortium (W3C), an organization that develops technological standards for the Web. He is committed to the ideal that the internet should be available to anyone, anywhere in the world, on any type of machine that has an internet connection.

This includes people with different technology resources, rural users or even people with disabilities which is estimated to be about 1 billion people worldwide.

In 2008, the W3C released version two of its Web Content Accessibility Guidelines (WCAG2.0). The same week, two major European standards organizations the Electrotechnical Commission (IEC) and the International Standards Organization (ISO) adopted those WCAG 2.0 guidelines.

Barriers

The work of standards organizations help us identify what barriers people face when using the Web. There’s a plethora of information on what Web Accessibility is and what barriers there was to users on the Web. To remove these barriers we must first define what they are. I will focus on three main points that generally define what they are for all users.

  1. Perceivable: The interface and the information on a Web Page must be presented in ways that are perceivable.
  2. Operable: The navigation components and interface must be usable.
  3. Understandable: The user interface and information must be understandable.
  4. Robust: The underlying code and programming is robust, adaptable, and secure.

Along with these main points, there are also four main disabilities that can affect access to the web.

Visual

  • Text Magnification hardware/software
  • Relative font sizes
  • Use of proper CSS
  • Small or poor contrast text
  • Color identifying information

Mobility

  • Limited mobility devices
  • Mouse typically not an option

Cognitive

  • Learning disabilities benefit from well designed and organized pages

Auditory

  • Multimedia barriers to users hard or hearing or deaf

Example

Here is an example of ways to design your image ALT text to remove barriers to disabled users when using screen readers.

Because screen readers cannot interpret the content of images on a web page, the use of “ALT” text helps describe in words to the user what the image content is. Taking the time to accurately describe an image content will greatly help the Accessibility on your site.

If an image is a… The ALT Text should…
Chart or Illustration Summarize and explain
Photo or work of art Describe the image’s content
Graphic or button with text Be the same as the image’s text
Functional icon without text Describe the action to be taken
Background or other decoration Contain an empty space (” “)

Although, ALT Text is meant to be short and concise, when longer descriptions are used to explain or describe an image it can be very helpful in breaking down the Web Accessibility barriers to users on your site.

Standards in Accessibility on the Web

As the we move forward in developing web standards and adhering to those standards, we help define what barriers users experience in terms of Accessibility when using the World Wide Web. Organizations helping pave the way for these standards are helping remove barriers to users across the world by evaluating the needs of users from all demographics.

For more information on related articles and resources used in this article:

How to Manually Update WordPress

This tutorial will show you how to manually update your WordPress site. There are many steps, and the auto-update feature of WordPress works typically with few issues, but if you need to do this process manually, this tutorial will aid you.

Begin the process by backing up your site first. Backup your current site data by going to Tools > Export.

WordPress admin menu: Tools

Export your site contents and use that file to import the data in-case of installation failure and your site crashes.

Also take time to download all of the files of your site, especially any outside of the wp-content directory. After downloading, you may zip the files to keep them together and save space. Between these files and the XML file export, you should be able to restore your site if there are problems.

Prepare for the Upgrade

To prepare for the upgrade, you should create a maintenance file and download the latest version of WordPress.

WordPress automatic updates initiate a maintenance file, an HTML file with information that the site is in Maintenance mode and will be offline shortly. You can create one easily in a text editor by doing the following:

  1. Create an HTML file with content that alerts visitor to the site’s maintenance mode.
  2. Save the file as index.html.
  3. Upload the file to the root directory of your web host server.
  4. Uploading uploading it will overrule the index.php file and be active.
  5. To “deactivate” the maintenance file, rename it from index.html to index.maintenance. When you wish to use it again in the future, rename it back to index.html.

Go to WordPress.org and download the latest WordPress zip (or tar.gz) file, and unzip it to its own directory/folder.

  1. Update WordPress Themes: Either manually or using the auto-update feature, update all WordPress Themes. If you have Themes you are no longer using or need, consider deleting them.
  2. Updfate WordPress Plugins: Either manually or using the auto-update feature, update all WordPress Plugins. If you have Plugins you are no longer using or need, consider deleting them.
  3. Deactivate WordPress Plugins: Some manual installation methods recommend disabling WordPress Plugins, then turning them of again after the update. This is optional, but highly recommended.

The next step is to replace your existing WordPress files with the new ones.

Replace Your WordPress Files

Installing WordPress manually involves uploading files from your computer to the web server. While it might work to simply upload the files and replace the existing files, glitches in the Internet connection could result in partially uploaded files or file uploading errors. It is highly recommended that you manually delete the files before uploading to ensure a better chance at a clean upload, thus a clean update.

Ensure you protect and do not change the wp-config.php or .htaccess file and other files necessary for your site to function beyond WordPress files.

  1. Delete the old wp-includes and wp-admin directories on your web host using an FTP client or Shell access.
  2. Upload the new wp-includes folder and wp-admin. (Do not delete your existing wp-content folder, and only delete directories that you are going to replace.)
  3. Upload any remaining loose files from the root directory of the new version to your existing WordPress root directory, protecting the wp-config.php, .htaccess, and other critical files not part of WordPress.

Run the Update

In a web browser, enter the address of the site followed by update.php such as http://example.com/wp-admin/update.php. This will run the update for WordPress to ensure any modifications to the database is complete.

Go to WP-Admin > Plugins to reactivate WordPress Plugins if you deactivated them.

If you have problems logging in, try clearing your cookies.

If your old site is still showing and you have caching enabled, you may need to clear the site cache.

If for any reason you can’t figure out how to complete your installation please view the WordPress Codex page for the extended upgrade instructions.

You can also restore your backup and replace the WordPress source files from your old version by visiting the release archive.

For More Information on Manually Installing WordPress

WordPress Words: DIV

A “DIV” is an HTML element that divides sections of your WordPress site.

Example: A user can customize their site by adding DIV tags around their content sections in the text editor. Then they can add custom CSS to their DIV’s by going to the Theme Editor in
Appearance–>Editor–>style.css and adding a new line in the file.

.main-grid-content {display:inline-block;background-color:#FFF;}

About the Word

The DIV tag in HTML is used widely on most websites today. By default, a DIV is a block level element, which means it will take up all of the horizontal space  in its current container. In WordPress DIV’s are used to create new sections of content within your site, that may be linked to current classes or new ones.

New sections can help you separate portions of your site to add embedded maps, special offers, promotions, contact information, images and other content.

For More Information